I week or so back, I bought a zat'nik'tel -- we'll call it a zat gun -- kit online. I am slowly upgrading my green, SG-1, on base, cosplay and I feel a zat really makes the look. Like the original MacGyver, I am not a fan of guns, and don't want anything that looks real for my cosplay.
So, how come it has taken me 25 years to get my outfit together? Well, college, grad school, student loans, moving cross country multiple times... You get the picture. If I have to choose between actually going to a convention and having a cool outfit? Convention wins.
So, here I am, pulling together entry-level
Stargate: SG-1 cosplay in the 25th Anniversary year of
SG-1. Anyone who saw me at Wondercon will know that I started very basic. I got plain black t-shirts, in multiples because I can't cope with not having a clean shirt every day at a convention. The t-shirts are Hanes and came in a 3 pack from Target. The green BDU pants and the green over shirt were found on Amazon for not very much money. The green shirt is a "Vietnam" style shirt. It looked the closest to an actual SGC uniform shirt, with the exception of some red stitching on the pockets that was probably meant to be reinforcement. It took only a couple minutes with a seam ripper to get rid of the red thread. I also bought a pair of okay-but-not-perfect replica patches to sew on the shirt and a pair of comfortable black combat boots in my size. The boots were the most expensive part of my cosplay, thus far. The last thing I want at any convention is sore feet or blisters.
My next big convention is likely to be
Comic-Con in July. I am still contemplating
Gateway, but work commitments mean I would only be able to attend Saturday and Sunday. It will involve a lot of red-eye flights, if I do it. Comic-Con in San Diego is all squared away, though. I have been going to Comic-Con for years and absolutely love the frenetic energy of the event. Hey, I grew up in Salem, Massachusetts, where people walk around dressed like witches all the time. Comic-Con feels like home to me.
I am working on my cosplay with a ready-by-Comic-Con timeframe in mind. I wore my BDUs as they were to Wondercon. I am not terribly tall, though, and both shirt and pants are very long on me. I plan to take about 6 inches off the legs of the pants and also take up the sleeves of the shirt by about the same amount. This will involve removing the cuffs, shortening the sleeves and putting the cuffs back on. All within my capabilities. When I'm ready to have a weekend of sewing, I will photograph the whole thing to post here. I'm sure I'm not the only fan who has needed to make these alterations.
But back to the zat. Like I said, this is the next item I wanted to add. There are two different types of zat kits out there. There is the always closed model and one that opens and closes. I believe there is also a mini zat available but did not look into that option. Since I primarily want to wear my zat in a holster, I went with the less expensive, always closed, option.
I did a bit or research and found an old online post by someone else who had done the same project. I also chatted online with friends on the
SG-Command cosplay forum. There is lots of great advice out there on what colors to use and how to prep your zat for painting. I combined what sounded best to me and went shopping.
My zat arrived, as zats do, in a cardboard box with a photo on the lid. Inside, the resin-molded replica was in two pieces: the main body and the top fin, along with a sheet of instructions. The zat is much heavier than I thought it would be. I was expecting it to be hollow, but it is actually solid resin. You can see from the photos at the end of this post that it had some rough edges and mould marks. Now, I am sure I will be scolded by someone, but when I was getting my theatre degree, I was taught to sand everything prior to painting. Paint adheres better to a surface that is slightly rough. I used a heavier sandpaper to gently knock down the mould marks and smooth the seams. Then I lightly rubbed the entire surface with a very fine sandpaper. This was just to take the shine off so the paint will stick better. Be very careful not to take the details off of your zat if you decide to use my technique!
The next step was to wash the zat with a little liquid dish soap and warm water. This removed any oil and all of the grit I created sanding. I let the zat dry overnight before continuing work the next day. Some people I have talked to recommend filling any holes in the zat's surface with putty or something similar prior to painting. I like Mouldable Glue for patching holes in resin. It is easy to work with and dries to a similar hardness to resin. Most of the pits in mine are going to end up under the fin where they won't show, so I did not bother with this step. I went right to spraying it with a basecoat of grey paint with primer included. Be careful when you spray paint not to put too much paint on at once. You don't want to end up with visible drip marks when your zat dries. If you do over-paint, this is not a complete tragedy. You can sand down the drip marks and touch up the paint with a brush or Q-tip. I painted one side of both the fin and the body of the zat, let them dry for an hour and then flipped them over to spray the other side of each.
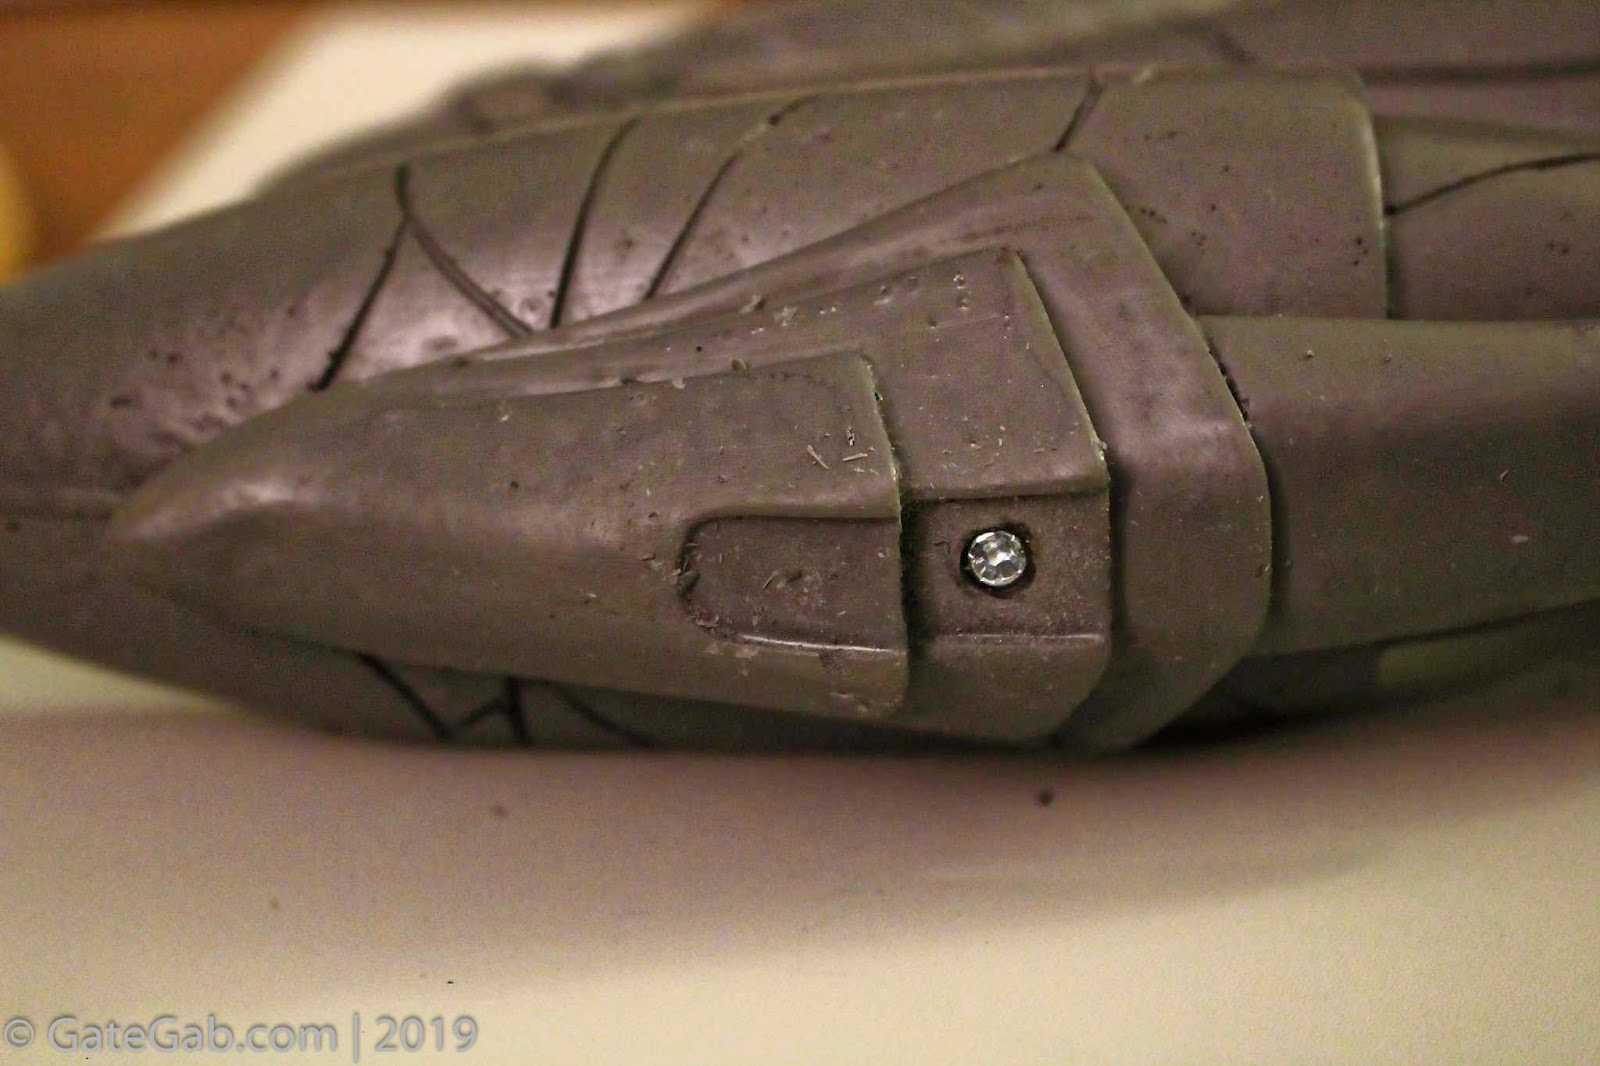
My next step was to attach the fin. Since I'm going to be hauling it around conventions for what I hope will be years to come, I chose to drill a hole through both the fin and body with my dremel and used a long thin screw to secure the fin. I put Super Glue on the underside of the fin before tightening the screw all the way. There is a variety of Super Glue that doesn't dry immediately. I prefer this kind. You can reposition something if needed and it washed off of hands more easily. I always get glue on my hands! As you can see, I chose to countersink the head of the screw. I then filled the hole and covered over the screw head with Mouldable Glue and let it harden before touching up the base paint. This makes my reinforcement more or less invisible to anyone who isn't looking for it.
Now my zat was ready to be made pretty. I bought a metallic bronze-colored paint as the main color of the body. The best way to apply paint to anything is in thin coats that you let dry in between. It takes patience, but always looks best. Also, make sure you always shake or stir any paint before you use it in case it has separated while sitting on a shelf at the store. I painted one side of the zat, waited for it to dry, and then flipped the zat over and painted the other side. Then I repeated until I was happy with the color. It was a rainy day, so the drying between coats of paint took a while. To keep the paint I put on my palette from drying out between coats, I covered the whole palette with plastic wrap, also known as cling film. I also rinsed my brushes off with warm water between coats of paint. I used inexpensive brushes with reasonably stiff nylon bristles. Despite being cheap, the quality of them isn't bad. I am sure I will find more uses for them in the near future, so I took the time to care for them properly.
With the body of the zat all painted it was time to highlight the details. I got some patina colored paint for this. I also got a pearlescent purple for the feathery looking bit at the bottom of the handle. I used a small brush for the purple and again did several thin coats waiting between each. I then used both a very thin nylon brush for the line-details and some q-tips to smudge the patina color around and get a more realistic oxidized look. I also did a little touch-up after that on some of the bronze areas to soften the detail lines a bit where I got a little carried away with the oxide paint. I plan to let the whole zat dry overnight and then spray it with a coat of clear, matt finish, paint. This will help prevent the decorative coat from getting damaged.
Including the day I went to the craft store for supplies, this project took me parts of four different days to complete. I'm sure you could do it in less time if you wanted to. I really enjoy a good craft project, though, and wasn't in any rush.
Below, you can see photos of each step of the project. If you have any questions about what I did, or why, you can reach me at
GateGabber@GateGab.com.
 |
| You can find this kit in a number of different places on the Web. Amazon.com and eBay both had them as of this writing. |
 |
| The zat comes in two pieces. It was slightly oily to the touch from the molding process. |
 |
| At first glance it looks pretty good. |
 |
| But closer inspection showed lots of little flaws that needed to be sanded off. |
 |
| You can clearly see a raised line of resin where the two sides of the mould fit together. |
 |
| The underside of the fin was rough, too. As it was, the zat would not have fit together tightly enough to be glued securely. |
 |
| The top of the zat's body was the roughest area. You can also see some small pits where there were air bubbles in the resin. I didn't try to fill these since they were going to end up underneath the fin. |
 |
| Time for sanding! I used the heaviest grit sandpaper in the multi-pack I bought to remove the mould lines and the roughest areas so the fin would fit tightly against the body. |
 |
| I used the finest grit sandpaper to roughen the entire surface of the zat. Paint adheres better to a rough surface. Just be careful not to sand out the detail on the zat! Having finished painting, I feel like I could have sanded it a bit more than I did. There are areas of the zat that looked smooth until they were painted. |
 |
| Sanding made the zat very gritty. A nice warm bath in soapy water was in order. |
 |
| All washed and ready for a base coat of primer. Be sure you wash off all of the soap. Paint won't stick if your zat is soapy. |
 |
| If I paint another zat in the future, I will get a very small file to clean up the detail lines with. You can see there are some small raised bubbles in the grooves. |
 |
| This is the type of paint I used as a primer coat. |
 |
| I like to put a garbage bag under objects I am painting. I can turn the dirty bag inside-out and throw it away to get rid of my mess. |
 |
| Still wet from the primer coat. |
 |
| Once the zat had it's base coat, I lined up the fin on the top of the zat and used my dremel to drill a hole through both pieces. Use a drill bit that is slightly smaller than the screw you plan to use. Also make sure your screw is long enough to go through both pieces! |
 |
| Installing the screw. |
 |
| You can see that I countersunk the head of the screw. This means I screwed it in until it was below the surface of the zat. |
 |
The next step was to fill the hole around the head of the screw with Mouldable Glue. I smoothed it off level with the surface of the zat with the handle of one of my paint brushes.
|
 |
| A dab of primer over the spot of Mouldable Glue, once it had hardened, and you couldn't tell that I had drilled a hole in my zat. |
 |
| Now the fun part. Shiny paint! |
 |
| You can see I covered my palette with plastic wrap in between applying thin layers of paint. I also washed my brush each time I stopped to wait for a coat of paint to dry. Washing brushes while the paint is still wet is the best way to make them last. |
 |
| Bronze done. Ready for purple. |
 |
If you smudge the paint, like I did in places, you can use a Q-tip to wipe the smudge off if the paint is still wet. This is part of the reason why I let each coat of paint dry completely before starting the next.
|
 |
| The green patina paint looked way too bright when it was wet. It looked better after it dried. |
 |
| I'm a bit of a messy painter. I went back later with a bit of the bronze paint on a Q-tip and touched up all the places I smudged my lines. |
 |
| Now it just needs a clear coat of sealer. |


Ypu did an AMAZING job!!That's so cool!! ❤️
ReplyDelete